


Retrofit Design, Drawings, and Text byBrion Sohn
List of parts required for this conversion.
Company Item Description HPI Z215 Button Head Screw 3x5mm HPI B070 Metal Bushing 5x8x2.5mm HPI A225 Traction Control Washer HPI A221 Traction Control Clutch Plate (outer) HPI A220 Traction Control Hub (inner) Yokomo ZC-630 Front Drive Pulley Associated 6628 Differential Spring Factory Works 6195 No One-way Spur gear adaptor Other Button Head Screw #6 .5" Other Washer 3x8mm (x2)
If you already have any of these parts you can use the existing pieces.
The Factory Works No One-Way adaptor requires the use of a second Yokomo ZC-630.
Tools Needed to complete Retrofit:
Flat File
5/16" Drill Bit
Thin CA
Xacto Knife
optional:
Fiberglass Cut-off wheel with Dremel Moto-Tool or Drill.
(these will make it easier to do Steps 1 and 4)
Step 1:
File 1/8" off of the threaded end of the Factory Works Drive Shaft.
Step 2:
Build Factory Works No One-way Spur adaptor as indicated by the instructions leaving the Yokomo Front Drive Pulley, Spur Adaptor and outer pin off.
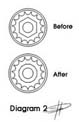
Step 3:
On new Yokomo Front Drive Pulley (ZC-630), cut the Hexagon into 12 equal sides with Xacto knife. (Diagram 2) Do not attach second side rail it will not be needed.
Note: The more accurate this is done the more centered the hub will be, allowing the use of higher pitch gears.
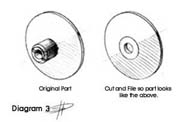
Step 4:
Cut drive portion of the HPI Traction Control Hub (A220) off. File flat until filed area is around 7/16"-1/2" in diameter. The filed portion of the plate should be as parallel to the front of the hub as possible. (Diagram 3)
Note: The more accurate this is done the less wobble final piece will have.
Step 5:
Drill hole in the filed HPI Traction Control Hub (A220) larger with a 5/16" drill.
Note: The more accurate this is done the more centered the hub will be, allowing the use of higher pitch gears.
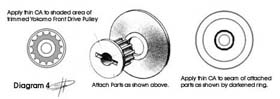
Step 6:
Install trimmed Yokomo Front Drive Pulley (ZC-630) into enlarged hole on filed HPI Traction Control Hub (A220) an glue together with Thin CA. (Diagram 4)
Caution: Be careful not to get to much CA on the pulley sprockets, doing so will cause major belt vibrations.
Step 7:
Complete installation on the Factory Works Drive shaft by following the order of parts in Diagram 1.
Note: Center spring between 3x8mm washers with fingers. If the spring is not centered It may cause system to bind.
Adjustment:
Fully tighten for the first run, then back screw out, loosening slipper, until optimum traction is achieved.
Troubleshooting:
Traction Control does not work at all-
Check to make sure that inner 3x8mm washer is fully seated against the outer bushing and not the drive shaft itself. If it is on the drive shaft, file until it seats properly.
Traction Control is not holding the desired setting-
Use a little Loc-tite on the adjustment screw.
Yokomo Front Drive Pulley is damaged or worn-
Remove old pulley from HPI Traction Control Hub by using CA Debonder or equivalent. Replace with new Pulley by repeating steps 3, 6, and 7.
Care:
Clean periodically to keep Traction Control Accurate. Use an Xacto knife to lightly scrape debris off of the Traction Control ring.
©1996 - All copyrights and trademarks are property of their respective companies.